Register xUI in ArcGIS Enterprise Portal
Use the hosted xUI manifest to make xUI available as a custom widget in your ArcGIS Enterprise organization.
Production license required
Development and evaluation are free. Purchase an xUI license before registering or deploying xUI for production use or making an xUI-enabled application available to end users.
ArcGIS Enterprise only
Custom Experience Builder widget registration is supported in ArcGIS Enterprise 11.0 and later. ArcGIS Online does not currently support this workflow. Portal administrator privileges are required.
1. Confirm the requirements
- ArcGIS Enterprise 11.0 or later.
- An account with Portal administrator privileges.
- A purchased xUI production license.
- The xUI manifest built for your Experience Builder version.
- HTTPS and anonymous browser access to the hosted manifest.
- Azure Blob Storage CORS configured to allow your Portal origin.
2. Copy and test the manifest URL
- Open the xUI Downloads page.
- Expand the row matching your Experience Builder version.
- Choose the xUI release you want to register.
- Select Copy URL beside View manifest.
- Select View manifest and confirm the JSON opens without a sign-in prompt.
For example:
https://xui.blob.core.windows.net/v21/0.7.1/manifest.json
Use the manifest—not the ZIP
The ZIP is for Experience Builder Developer Edition. Portal registration uses the public HTTPS address of the hosted
manifest.json.

3. Add the widget to Portal
- Sign in to your ArcGIS Enterprise Portal as an administrator.
- Select Content from the top navigation.
- Open My Content.
- Select New item or Add item, depending on your Enterprise version.
- Choose Application.
- Select Experience Builder widget.
- Paste the xUI manifest URL into the URL field.
- Click in the Title field. Portal should read the manifest and populate the title.

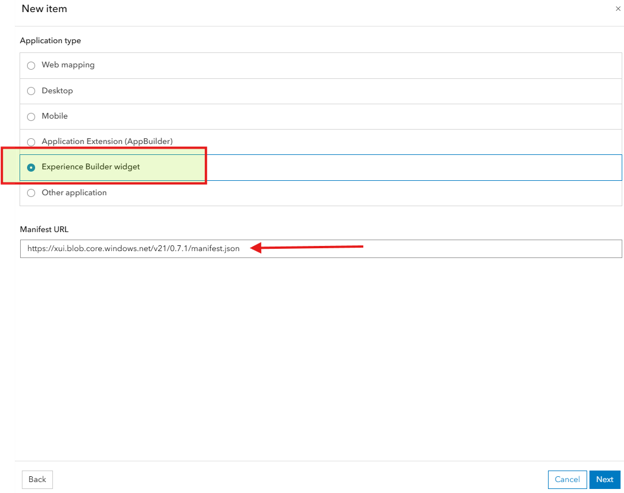
manifest.json. Press NextName the registered version clearly
Use a title that identifies both the xUI and Experience Builder versions:
xUI 0.7.1 — Experience Builder 1.21Suggested tags:
xUI, Experience Builder, Custom Widget, EXB 1.21, xUI 0.7.1Suggested summary:
xUI custom widget release 0.7.1 for ArcGIS Experience Builder 1.21.
A valid xUI production license is required for deployment.
Complete the form and select Add item or Save.
5. Verify xUI in Experience Builder
- Open Experience Builder from your Enterprise Portal.
- Create a test experience or edit an existing one.
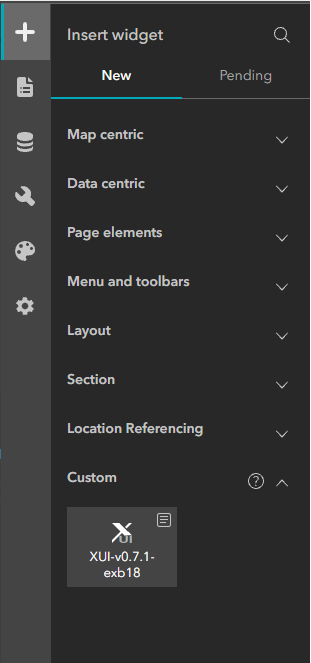
- Open the Insert widget panel.
- Find the Custom group.
- Confirm xUI appears, then add it to the experience.
- Configure xUI and complete a functional test before using it in production.
6. Register a newer xUI release
Register each xUI release as a new Portal item instead of silently changing the previous registration:
Existing: xUI 0.7.1 — Experience Builder 1.21
New: xUI 0.7.2 — Experience Builder 1.21- Register the new version using its new manifest URL.
- Test the new widget in a nonproduction experience.
- Move applications to the new version through your normal release process.
- Retain the prior item temporarily for rollback.
- When it is no longer needed, unshare or remove the older item.
7. Troubleshooting
Portal cannot read the manifest
- Open the manifest URL in a private or incognito browser window.
- Confirm it does not require authentication.
- Confirm the address uses HTTPS and returns JSON.
- Confirm Azure Blob Storage allows CORS requests from the exact Portal origin.
- Check the browser developer console for CORS, certificate, or 404 errors.
xUI does not appear in Experience Builder
- Confirm the item type is Experience Builder widget—not AppBuilder Extension.
- Confirm the item is shared with your account or organization.
- Confirm the widget is registered in the same Portal organization as the experience.
- Sign out and back in, then reopen Experience Builder.
xUI appears but does not load
- Confirm the xUI release matches the Enterprise Experience Builder version.
- Confirm all hosted widget resources are publicly accessible through HTTPS.
- Inspect the browser console and Network panel for blocked or missing resources.
Portal registration checklist
- ArcGIS Enterprise 11.0 or later
- Portal administrator account
- xUI production license purchased
- Correct manifest selected and tested
- Experience Builder widget item created
- Version clearly identified in the title
- Item shared with the correct users
- xUI verified in the Custom widget group
- Functional test completed